Showing posts with label Stampers Anonymous. Show all posts

Monday, 13 May 2013

My Steampunk Book

Another wet weekend for many, hope you had a good time anyway I made the most of it by playing in my craft room at the very top of the house.

I have been working on my Lifebook 2013 pages and because of the house move and opening the shop I am so far behind in fact I have just finished a page for February.

We have just had two wonderful workshops, here are some pictures of the book we made using Graphic 45 paper and a Seawhite Journaling book.

The cover we made from scratch then painted and aged with cogs and clocks from Tim Holtz Sizzix dies and a Optical lens from Jamie's collection.


We made tags and pockets for journaling or photo's. You can just see a fine gentleman stamp from Paper Artsy HP1108.


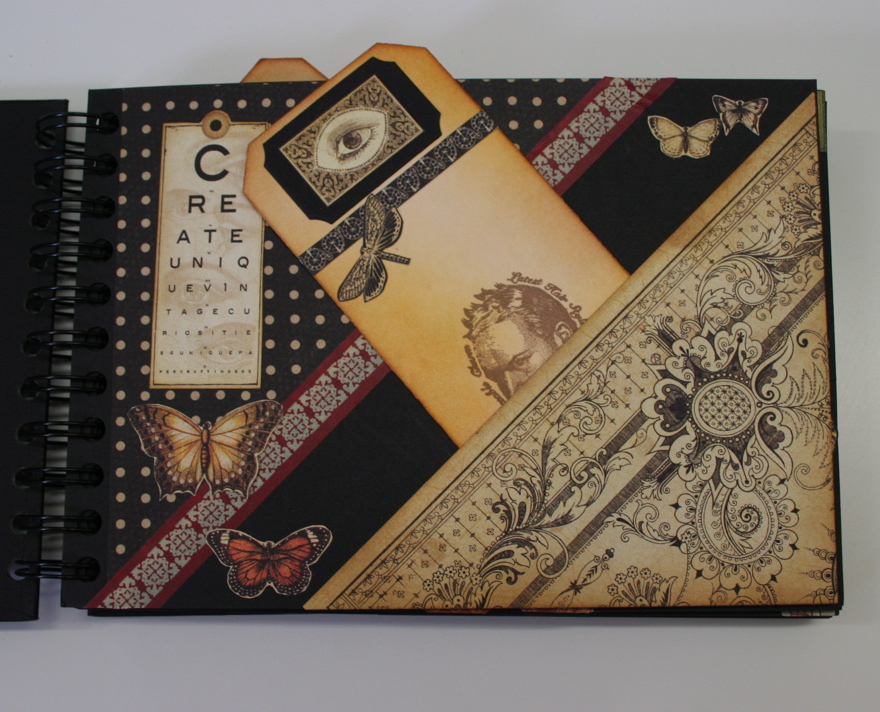
Hers is a card slipped behind a band.


The card open with another area left for photo's. It is edged with Wild honey and Vintage Photo Distress Inks these colours compliment the papers beautifully.


The pockets are large tags folded over with two different size of tags inside. All cut from sizzix die's.


These are stamped with sentiments from Stampers Anonymous CMS110 Stuff to say.


The little tag on the tag has been embossed with a Sizzix Texture Fade Diamond Plate, there are two in the pack the other is Riveted metal which we also used on the front cover.


The fine script stamp is on CMS087 Shabby French another great stamp From the Tim Holtz collection, it is a older stamp but so useful. Because it is a background it was stamped using Wild Honey Distress Ink.


Another of the stamps from CMS110 Stuff to say, this time with Archival Ink. The quote is pretty apt I thought.


A little book and edged with the Sizzix Lace Die.


And inside a picture of my lovely Mum. 


A page with two pockets and the stamps are from CMS087 Shabby French and the diamond pattern from CMS063 Mini Muse.


The edge of the page was cut using the "Ornate" on the edge die.


Another little book cut from the Matchbook Die.


And because I don't like to waste anything all the little bits have been used to fill this book.


I really enjoyed this workshop and if anybody is interested in taking it, let me know and I will run it again. There are so many pages in the book I could even do some new pages.

Have a good crafting week and as it's not fit to go out in the garden I am going to stay in the safety of my crafting room with my trustee crafting companions Jack and Bru. (who don't pinch my scissors).

Bye for now Sharon

There is a workshop on Saturday The Altered Photo Canvas. You can bring along your own photo on a memory stick if you would like to do something different. if you are not sure check with Jamie (the technical department).

Tuesday, 5 February 2013

My February Tag

Hello everybody, not sure where the time has gone, guess that is what happens when your are really busy. Not complaining though, we have had a lot of fun creating projects for our new upcoming workshops

We have so many super ideas, if you are interested pop and have a look at ATP. But of course the most exciting news that Finnabair is coming to Derbyshire to do a workshop for us, the details have yet to be finalised but we know that there will be 4 separate classes and there has been a lot of interest already.

I received a new stamp from the lovely people at Craft Individuals and because he is such a cutie I thought he could feature in my february tag..... So here's Party Puffin.


I painted the background with Paper Artsy's Baltic blue, then added snowflake to Indigo Blu's Bubbles (BB1) Background stamp. When completely dry I applied a coat of Satin Glaze all over to give it a sheen.

I then stamped Party Puffin (CI-376) onto white card and cut it out, I also stamped it onto a scrap piece of black cardboard to give it some depth. He was coloured in using distress markers and his crown painted with Old gold paint.

"Love" is from Tim Holtz stamp Stuff to Say (CMS110) and coloured again with distress markers. The I and U are grungeboard letters that I have had for ages.

The tag has been matted on black card and a heart ribbon added, very easy to do and I think it would make a super Valentine's card.


Here is a quick peek at a background I did in my journal. I really love doing backgrounds, but my problem is I don't like covering them up.

It is Paper Artsy Acrylic paints and Crafters workshop stencils. Thanks again to Leandra from Paper Artsy for the super Video on You Tube of how to do the Bump Stencil Technique.

Don't forget go over to the shop to have a look at the workshops, there will be new one's arriving, and there's new stock coming all the time, soo.. exciting.

Well i'm off Pondering Petunia is waiting to be sprayed and painted, if only it was that easy to look gorgeous, I think I will have to settle for a pair of striped socks.

Bye for now, thank you for popping by and leaving lovely comments.

Sharon xxx

Tuesday, 15 January 2013

True Intentions

I have decided I am going to try and do my own tag each month. The theme for my Tag for January is Found Stuff. As much as I love Tim's tags I am trying not to be influenced in my design.

Most of the embellishments I found on my craft desk after doing a mixed media canvas, you know what it's like you have an idea, make something and then it doesn't fit in with what you are doing, so it sit's there but you don't want to throw it away.

The quote on Tim Holtz stamp "Words for Thought" CMS132 sums it up perfectly and I also like his new burlap panels, but I am so impatient I want them now. Well I have had to settle for a scrap of hessian and some organic muslin, which look really good sprayed with Dylusion Ink Sprays.

A large NO 10 tag went through my Big Shot Machine in a Sizzix honeycomb folder then coloured with distress inks.

The smaller tag was embossed with white powder so it resist's  the distress ink. The stamp used is CMS087 "Shabby French".

Theres small cogs, which have been given some texture and others cut out of metal and coloured with paint and alcohol inks. Half of a weathered clock cut out is placed under the tag and behind the name plate. On top of that is a tattered flower and leaf.


Well I think that's enough about my tag, hows the weather with you. It snowed on Sunday but was gone by Monday Morning but it's looking a bit black at the moment, so more could be on it's way.

You may have read that I have signed up for the Lifebook 2013 course and I am really enjoying it. It's taking me out of my comfort zone, but I am also making good use of my stash. So if you need some inspiration and would like to learn new technique's go over to Willowing.org. Here's a peek at one of the pages of the book I have done.


The words inside the ballons are be grateful, be happy, be honest, never give up and make good memories, these are my True Intentions for 2013.

Hope you enjoy my pages see you soon,

Sharon x

Monday, 7 January 2013

Here's to the new year ahead

Happy New Year to you all and I hope you had a most enjoyable Christmas. Jamie and I spent Christmas at home with the boys (Jack and Bru) they enjoyed opening their pressy's, chew sticks and footballs for both.

So after one day of watching too much television the boredom set in, the best cure for that is crafting,  especially when I had some new stash to play with. Oh the luxury of new paint brushes, but the next projects I'm going to share with you I didn't use a brush.
I decided to have a go with cut and dry foam after watching Leandra's Video's on you tube, if you need some inspiration pop over and have a look they certainly got me tapping.


I have used a combination of Paper Artsy, Indigo Blu and Stampers Anonymous stamps.


The flowers and leaves are from Indigo Blu's stamp Bloomin Great using Archival Ink Colbolt.

I have also stamped with Paper Artsy's Acrylic paint onto a Paper Artsy mini no 71.
I also tried with a different acrylic paint that wasn't chalk based but I was unable to blend them as well.


The watch face in the background is a Ink and the dog stamp Clocks Plate 1 and the car is from Tim Holtz Mini Muse CMS063.


This really is a fun technique Leandra calls it Corner Corner Side. The next thing on the agenda is to work on building up my layers, I don't like covering up a nice background but I always admire other peoples work.

I have also signed up for the Lifebook 2013 online course by the beautiful and very talented Tam of Willowing Arts, so far I have done the warmup page and stage 1 of the course and I am loving it. I have been using paints and pens that I had forgot I even had and never used because I didn't know how to. So here's to a new year of learning and exploring.

I would like to say a special thank you to all our customers and friends of the blog and Facebook for all the orders you make and the kind comments you give.

See you soon Sharon xx


Tuesday, 20 November 2012

Jack in a Box


Hello

It's Tuesday again and the day I always think about blogging. Maybe because I have had a good crafting weekend, partly due to bad weather and the Grand Prix, if you know what I mean.

I have decorated a little house and I promise you this is the last christmas decoration I am going to make. Well this week anyway.


It is a wooden house that we sell at £3.49 a bargain. It needed a coat of paint so as usual I grabbed my favourite paints Paper Artsy Acrylic's and used Baltic Blue with a little dry brushing around the edges.

While that was drying I cut out the Pennant from the sizzix on the edge die aptly named Pennants twice, once with plain lining material and the second with a piece of card.

The material I sprayed with a Dylusions Spray London blue and left that to dry before stamping with the snowflakes from Tim Holtz CMS066 Mini holidays.
When all dried I glued the material to the card and then stuck the Route 52 Snowflakes to the back of the card.

The little Route 52 Bucket is painted with Pearl Dabber, the little boy who is posting his letter to santa was left over from the Shadow Box Drawer's. All the paper is from Graphic 45.

I painted the corked Vials and then stamped onto them when dried and decorated with Idea-ology Tinsel Twine.
The "Believe" Philosophy tag I wiped Snowcap Dabber over and removed to show the word better.

I made a little christmas card and distressed the edges and applied a little stamp from the Graphic 45 papers. So that's 2 projects and only 3 pieces of cardstock, I like to get good value from my paper.

The little bows that are dotted around are cut from the Sizzix Movers and shapers Mini Wreath and bow, which is at the apex of the house, plus the 25 from the reindeer and 25 set which has been embossed with Ranger's Rich Red (before embossing it looks a really bright red but changed to a lovely deep red).

Christmas Carols was stamped onto shrink plastic, I find the easiest way to shrink it without losing it, is place the piece in a box and let it go from corner to corner.

Hidden in the bottom corner is a ticket from a strip die and stamped with Merry Christmas from Tim Holtz CMS100 Odds and Ends there's something for every occasion on that stamp set.

Lastly Jamie wanted snow on the roof, so I splodge Mod Podge around the edges then sprinkled with Rock Candy Dry Glitter, I thought it looked quite nice but Jamie pointed out That it was frost and not snow.

Theres also the really cute wooden reindeers at the bottom and I think that's about everything.


Jamie's just made a lovely mug of coffee and then look what we found in the Photo Light Cube.

Oh Jack!!


Thursday, 15 November 2012

Christmas Icon

Hello everybody,

Hope you are all having a good week with plenty of crafting going on.
I have discovered I work best when I have three projects on the go at the same time. Maybe it's because as one thing is drying I can get on with the next, it also gives me time to think.

Here's one the projects I have finished a little Icon which you can buy for a small amount. I have turned it into a tea light holder. (The tea light is battery powered not a real flame one).


After gluing the Sizzix mini Reindeer and 25 onto the Icon I painted it three times, firstly with Paper Artsy Ice Blue then Sky and finally with Baltic Blue. After each coat I rubbed the paint off the reindeer and 25 and a bit around the edges to give it a worn look and to reveal a small amount of the colour below.
When it had completely dried I stamped the small snowflakes from Tim Holtz CMS066 Mini Holidays with perfect medium then embossed with Polysparkle Embossing powder.
I also went over the Reindeer and 25 with PA Metallic glaze just to give them that extra sparkle.


The Pine trees have been cut from Sizzix's on the edge die "Tree Line" out of grunge board, then painted green leaving an area at the bottom to add the snow.
I applied perfect medium from a reinker to the tops and edges of the trees then sprinkled white embossing powder over it, I hope it resembles snow fall.
Finally I have used Tinsel Twine in silver from the Idea-ology range.

Tomorrow I will show you another little christmas project I have done, unless I get to go shopping.

Thank you again for stopping by and I do appreciate your lovely comments.