Showing posts with label Card. Show all posts

Sunday, 28 June 2015

Stenciled card with Alison Bomber.

We have very good news for you - Alison Bomber is back with another project. This time she has prepared a beautiful card in a colour combination that is her trademark. Alison is using The Crafter's Workshop stencils that are the theme of our June's ATP Exchange Challenge. Here you can find more details. We hand you over now to Alison:


Hello everyone, Alison here from Words and Pictures, and I'm so happy and honoured to be back here at Artist Trading Post with another Crafter's Workshop stencilling project for you today. Unusually for me, it's a card.


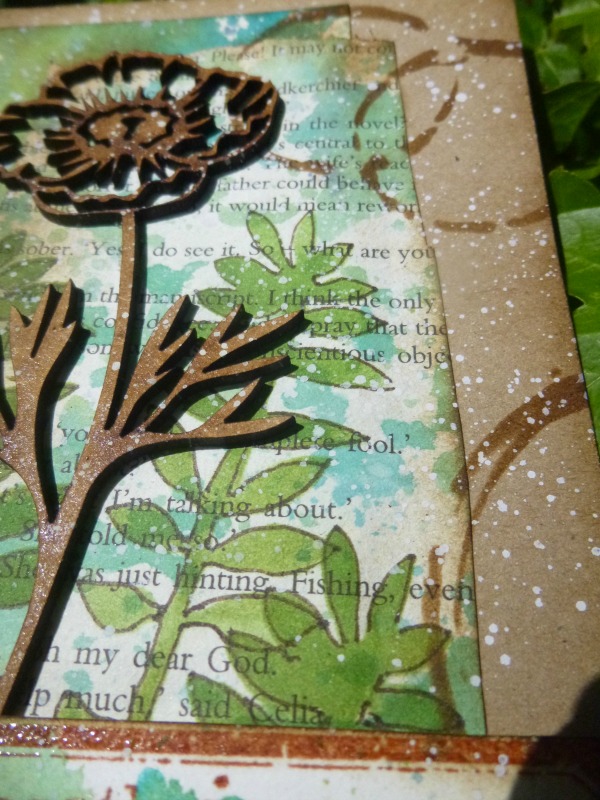
This creation is a simpler affair than the altered box I shared with you earlier in the month, but like that box it uses Kasia's wonderful Herbarium stencil as well as the fabulously grungy Coffee  Splotch template.
I haven't got many "making-of" photos - partly because this was made up mainly of leftover scraps! I often work with blues and greens, so this is what my scraps usually look like.  The book page had been used to blot up leftover inks from the craft sheet, as had the watercolour paper panel behind it. I layered them together onto some folded kraft card and stuck them down.
Then I stencilled the longest stem over the scraps several times, blending Peeled Paint, Shabby Shutters and a touch of Mowed Lawn.  I decided I wanted the stems to have a more defined look against the slightly busy backgrounds, so I placed the stencil back over them and used a PITT pen to outline the leaves.

The MDF flower comes from Calico Craft Parts, and it just seemed like the perfect focal point against all that lush greenery, with the leaves echoing Kasia's leaves in the background.

I added some extra detailing with the Coffee Splotch stencil, done in Walnut Stain Distress and Potting Soil Archival inks.  And of course I find it very hard to manage without plenty of splatter these days!
I stamped the words onto another splattered scrap in Sepia Archival ink, clear embossed them, and mounted them on padded tape for an extra pop of dimension.

And that was pretty much that!  I hope you like it, and I've got one more stencilled creation to share with you in the coming days.  Thanks so much to Kasia for inviting me along to play, and I hope you'll be inspired to play with your Crafter's Workshop stencils too.
Alison xx
Thank you Alison for sharing your beautiful creations with us. We can't wait to see more :)
Here is list of products from Artist Trading Post that Alison used:


Please remember that our new ATP Exchange Challenge is running. And for all of you who need more TCW stencils we have a special offer: we are running a promotion which enables you to buy any amount of 6"x6" TCW stencils and receive free shipping.

Simply place an order containing only 6"x6" Crafter's Workshop stencils and select "TCW 6"x6" free postage" from the shipping menu. This offer runs till July 12th. (UK customers only)

Please note, orders combined with any other products are subject to our normal postage rates, and are not part of this promotion.

Wednesday, 15 April 2015

April's Guest Designer - Anne Redfern

Hello!
We hope you enjoyed Wendy's tutorial from the last blog post because today we have even more for you. There is another special guest on our blog - our April's Guest Designer - Anne Redfern. Anne is a regular customer and visitor to our shop and a very talented artist and blogger who loves Wendy Vecchi products and creates magic with them. She has designed a project especially for us, and we hand you over now to Anne:


I was so thrilled and very honoured to be asked to be Guest Designer for Artist Trading Post where the fabulous Wendy Vecchi is being featured this month.  I adore Wendy's style and products, of which I have many, the hardest decision was - which ones do I use!
I created a card which is very much in Wendy's style but I used a 'variation' on her wonderful faux plaster technique to create my background.


Plain white, uncoated card was used for the base.


Archival inks in Potting Soil and Forget-Me-Not were applied to the card with a blending tool.  There is no need to wait until it dries.


Place some Rubbing Alcohol/Surgical Spirits in a small spritzer bottle and spray lightly over the card.  A fine mist is best (make sure to work in a well ventilated space).  It will dry very quickly.  Next, give it a very light spray with Picket Fence Distress Spray Stain and allow to dry. The result is a beautiful mottled effect.
Using one of Wendy's Stamp it, Stencil it, stamp the design in Archival Ink and use the Stencil along with Archival Inks to colour the flower and leaves.


Colour and cut out several layers of flower to give dimension.  Use a cotton bud to add some shading to the centres of the flowers, again with Archival ink.
Stamp some Wendy flourishes and a sentiment and stencil on the other side to give balance to the card.  Add a small vase.  This one uses Wendy's famous faux crackled glass technique with alcohol ink in Sail Boat Blue dabbed over the top.
Above is a close-up of the background and beautiful Hydrangea flower.
I enjoyed doing the background so much, I created another card.  This time I finished off with Wendy's fantastic crackle paste, coloured with Potting Soil re-inker to create the stencilled pattern on the right.  The jug uses Wendy's faux graniteware technique.
 Apart from the Picket Fence Distress Spray Stain, all the products used can be found in Wendy Vecchi's range of products.  I do hope you like what I have created for you today and that you feel inspired to 'Create Art' the Wendy Vecchi way!  Thank you again to Artist Trading Post for having me as Guest Designer! 
 Hugs, Anne xx
 Products Anne used:


Thank you Anne for sharing your beautiful project and technique with us. You are a constant inspiration! 
Have a beautiful day!

ps. If you would like to be one of our guest designers enter our challenge which ends in 6 days:)

Monday, 7 January 2013

Here's to the new year ahead

Happy New Year to you all and I hope you had a most enjoyable Christmas. Jamie and I spent Christmas at home with the boys (Jack and Bru) they enjoyed opening their pressy's, chew sticks and footballs for both.

So after one day of watching too much television the boredom set in, the best cure for that is crafting,  especially when I had some new stash to play with. Oh the luxury of new paint brushes, but the next projects I'm going to share with you I didn't use a brush.
I decided to have a go with cut and dry foam after watching Leandra's Video's on you tube, if you need some inspiration pop over and have a look they certainly got me tapping.


I have used a combination of Paper Artsy, Indigo Blu and Stampers Anonymous stamps.


The flowers and leaves are from Indigo Blu's stamp Bloomin Great using Archival Ink Colbolt.

I have also stamped with Paper Artsy's Acrylic paint onto a Paper Artsy mini no 71.
I also tried with a different acrylic paint that wasn't chalk based but I was unable to blend them as well.


The watch face in the background is a Ink and the dog stamp Clocks Plate 1 and the car is from Tim Holtz Mini Muse CMS063.


This really is a fun technique Leandra calls it Corner Corner Side. The next thing on the agenda is to work on building up my layers, I don't like covering up a nice background but I always admire other peoples work.

I have also signed up for the Lifebook 2013 online course by the beautiful and very talented Tam of Willowing Arts, so far I have done the warmup page and stage 1 of the course and I am loving it. I have been using paints and pens that I had forgot I even had and never used because I didn't know how to. So here's to a new year of learning and exploring.

I would like to say a special thank you to all our customers and friends of the blog and Facebook for all the orders you make and the kind comments you give.

See you soon Sharon xx


Tuesday, 14 August 2012

Purple is the Colour

This time last week we were having Fish & Chips in Aberystwyth with Sue & Stuart (Jamie's Mum & Dad). We decided on the Pier Restaurant and I can say they were scrummy. They popped over to see us from Derbyshire.

We had a few wonderful day's and Sue even managed to get a bit of craft shopping in. They left us on Wednesday teatime so Sue was able to go back to work on Friday.

But she still managed to make a beautiful card and get it to us on Saturday morning, fast going......and here it is......


I can remember many years ago standing in Sue's kitchen and getting her to show me how to stamp, I owe a lot of thanks to Sue.

The stamp is Paper Artsy HP1216 the back ground was painted using Fresco Finish Acrylics- Moonlight. Also incorporated into the design is the mini Tim Holtz Dress Form Die. 

Purple seems to be the theme colour this week, so here's a hanging tag I made.

I painted a large piece of card with FFA Pansy and Rose then dabbed Sherbet through a stencil. When it was dry I cut two tags using Sizzix Tag And Bookplates large die.

I cut one of the tags in half to create the bottom tag and connected then using a off cut of card which I stamped with the star design off LPC008 and added a pen nib.


The main stamp and the one at the bottom is off LPC012.

I have used Crackly Tissue paper down the sides cut with a On the Edge die called Ornate and gently coloured it with Dusty Concord Distress Ink.

The Mini Flourish at the top is painted with a Pearl Dabber.

The Embellishment at the very bottom was a gift from Anneliese when she came back from Ranger U.

The sun is shining so I thought I would take some photo's of the flowers in the garden, we haven't had much time to spend in that department.

Here's the Hayrack:


Lillie's:

Chicken's not where they are supposed to be, Brusier And I shall soon have then back in the paddock.


Where are they Bru and Jack?


Back where we would prefer... But not for long I,m sure.


I am going to go and get inky, we have just taken delivery of some New paper's from Kaiser which need a coat of looking at, so by for now and thank you for looking in.

And I always appreciate you comments.

Sharon