Monday, 13 May 2013

My Steampunk Book

Another wet weekend for many, hope you had a good time anyway I made the most of it by playing in my craft room at the very top of the house.

I have been working on my Lifebook 2013 pages and because of the house move and opening the shop I am so far behind in fact I have just finished a page for February.

We have just had two wonderful workshops, here are some pictures of the book we made using Graphic 45 paper and a Seawhite Journaling book.

The cover we made from scratch then painted and aged with cogs and clocks from Tim Holtz Sizzix dies and a Optical lens from Jamie's collection.


We made tags and pockets for journaling or photo's. You can just see a fine gentleman stamp from Paper Artsy HP1108.
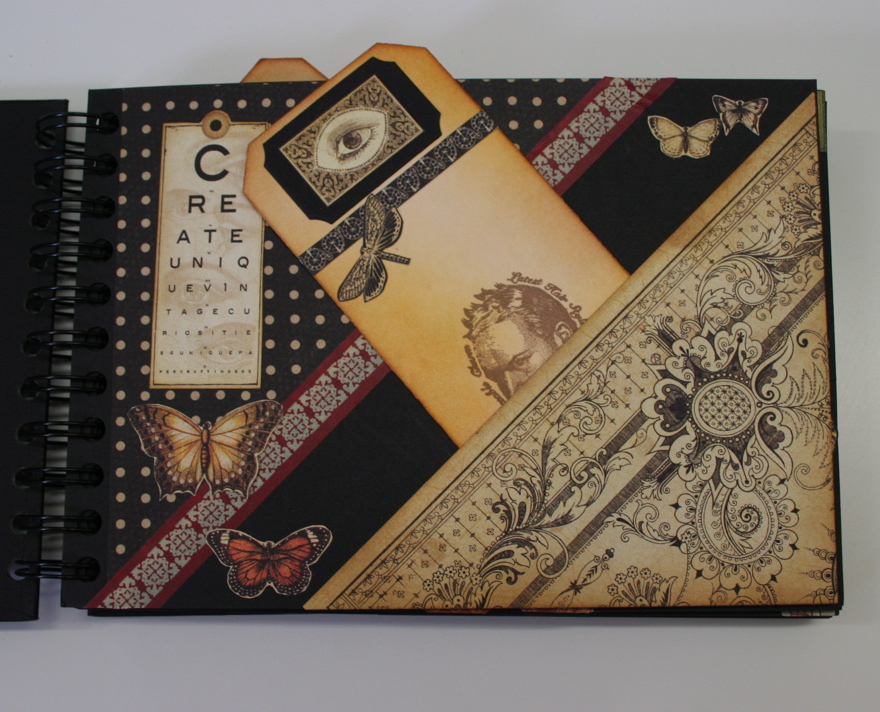

Hers is a card slipped behind a band.


The card open with another area left for photo's. It is edged with Wild honey and Vintage Photo Distress Inks these colours compliment the papers beautifully.


The pockets are large tags folded over with two different size of tags inside. All cut from sizzix die's.


These are stamped with sentiments from Stampers Anonymous CMS110 Stuff to say.


The little tag on the tag has been embossed with a Sizzix Texture Fade Diamond Plate, there are two in the pack the other is Riveted metal which we also used on the front cover.


The fine script stamp is on CMS087 Shabby French another great stamp From the Tim Holtz collection, it is a older stamp but so useful. Because it is a background it was stamped using Wild Honey Distress Ink.


Another of the stamps from CMS110 Stuff to say, this time with Archival Ink. The quote is pretty apt I thought.


A little book and edged with the Sizzix Lace Die.


And inside a picture of my lovely Mum. 


A page with two pockets and the stamps are from CMS087 Shabby French and the diamond pattern from CMS063 Mini Muse.


The edge of the page was cut using the "Ornate" on the edge die.


Another little book cut from the Matchbook Die.


And because I don't like to waste anything all the little bits have been used to fill this book.


I really enjoyed this workshop and if anybody is interested in taking it, let me know and I will run it again. There are so many pages in the book I could even do some new pages.

Have a good crafting week and as it's not fit to go out in the garden I am going to stay in the safety of my crafting room with my trustee crafting companions Jack and Bru. (who don't pinch my scissors).

Bye for now Sharon

There is a workshop on Saturday The Altered Photo Canvas. You can bring along your own photo on a memory stick if you would like to do something different. if you are not sure check with Jamie (the technical department).

Thursday, 2 May 2013

Our New Shop in Wirksworth

Hello everybody long time no blog. 

So sorry but as you may already know we have moved from Wales to the super town of Wirksworth in Derbyshire and we have opened a shop at Newbridge Works down Coldwell Street.
We are situated next to the Ecclesbourne Railway, which some of the Gentlemen callers have found interesting, while leaving the ladies to shop at their leisure. There are some beautiful walks close by and some very nice shops in the town as well and I must mention the bakers just up the road, the pies are to die for.

Here are a few Photo's the shop needs some more signs outside and inside needs more samples but it is early days.

The New Julie Nutting Dolls Stamps.


Paper Artsy Paints, Distress Inks, Dylusion Sprays, Alcohol Inks, Distress Markers, Perfect Pearl Mist and the list goes on.


 Canvases and plenty of Tim Holtz Idea-ology.


 Darkroom Door Stamps, Route 52 charms and Studio 490 Art Parts.


 Jamie wondering what I am doing.


 Paper Artsy Chalk Acrylics including the new colours and glazes.


 All of the colours of the Distress paints.


 There are three sides to this stand and all are full of The Crafters Workshop Stencils. Yummy....


 Front of the shop. Crying out for a Colourful Sign.


Prima Junkyard findings and Sunset Sunrise Trinkets.


So if you are in the area please come along to see us and don't forget to check out the workshops we are running. 

We have already had one workshop, a Steampunk Book a couple of weeks ago, and our  next workshop is an Altered Photo Canvas on Saturday 18th May, there are some places left so it's not to late to book.

Love to see you soon

Sharon

Monday, 18 March 2013

New Jofy Stamps

I have a few photo's to show you of the projects Jamie and I did when we attended a workshop with
Leandra from Paper Artsy.

I am ashamed to say we were late for the start, we went to to wrong end of the hall at the NEC and have you ever tried to get from from end to the other without knocking anybody over, not easy.
Well we managed to catch up and we really did enjoy the workshop, so all was well in the end.

Heres my picture using JOFY 09 stamp and Paper Artsy Paints. We did use some of Lin's stamps from the Eclectica range on the base layer, then applied paint with a sponge or scraper and stamped on top of the dried paint with Archival Ink. We used Translucent paints for the flowers so that it did not cover up the text and you can keep applying layers to build up depth and shading.


Here's Jamie's Picture using the same JOFY stamp. "Time" is off Sara Naumann's stamp E3 no 5.
Art in Bloom off E3 no 1


This picture I did after the show, I embossed on Indigo Blu's Black Cardstock with white embossing powder. Then painted using various colours of Perfect Pearls.


We are off  to the NEC on Wednesday for the Hobbycrafts show which starts on Thursday, so if I'm not about you can see what's happening by checking out our facebook page.

Toodle pip

Sharon x

Thursday, 28 February 2013

Hand Carved Flowers

They are finally coming in, Lin Brown's fantastic new stamps, Carved Flowers from Paper Artsy. They are part of the new Eclectica3 range, and I am in love with them. I just have the one at the moment but I shall be stalking the delivery man tomorrow.

I found them so versatile with ink or paints, the possibilities are endless. You must pop over to Lin's blog at Yours Artfully where she is giving a free tutorial on the stamps. I'm trying to resist having a look till after I have posted this blog.

Here's a few photo's of the samples I have done:


The backgrounds are Chalk Acrylics sponged onto a piece of mount board. The main flower on the board is stamped up using distress inks Broken china and wild honey and the cut out flower was painted with Beach Hut and when the paper had dried stamped using Butternut paint, and the colours matched really well.

The wording is off Paper Artsy Petals Plate 6 and a few other bits from older PA stamps.

The centre of the flower is highlighted with Adirondack Dimensional Pearls in Butterscotch.


Same idea for the background but on this picture you will notice a few of JOFY's new stamps have sneaked in. Even though Lin's and Jo's stamps are completely different styles they do complement each other.

These flowers have been stamped onto painted card with Archival Ink and highlighted with a White Posca Pen.


Maybe just a word of warning it can became a bit addictive, by the time I had decided which flowers to use my desk looked like a flower garden, not a bad thing though.

See you soon

Sharon x 


Friday, 22 February 2013

Just for Fun


Hello everybody,

Well the sun seems to be hiding today but we have had some glorious days. On Sunday, Jamie and I went to the NEC trade show. There was lots of new products and a real sense of excitement around the show, I cannot wait waiting to get cracking with the new lines we have ordered.

Dont forget to Like us on our home page of the shop, then when Jamie posts about the new goodies you will not miss out.

Before the show I had a little play time just for me.

So out came the Dylusions Inks, stamps and stencils. My new Posca pens, which are just brilliant for journaling as they will write over just about everything.

I made a seat for pondering putunia out of washi tape and created a figure using hands for body a bit strange but fun.

I used the letter jumble stencil 9 x 12 for my lettering Have Fun and Create Art just by using a black posca pen to trace and then highlight with some white dots.

Hope you like


I was going to show what we made at the NEC but Jamie didn't think it was fair until we had got the stamps in. Sorry (hope they come in soon they are fab).

See you soon

Sharon x 

Thursday, 14 February 2013

Happy Valentines Day

Jamie and I would like to wish all you lovely people a Very Happy Valentines Day. (just in case the other half forgot).

So I made you all a little card, you have just got to share it between you.


close up


I wanted to see what effect you would get when you blend Paper Artsy Paints and Distress Stains together.


So I applied a small amount of Sherbet and Rose Chalk paint along with Brushed Pewter Distress stain onto the craft sheet, spritzed with a drop of water and then swooshed my card through it. 


And that's the effect I got, I blended in Broken China Distress Stain to a small area so that it wasn't too pink.

The stamp in the background is 'Love Is' by Indigo Blue, and the sweet Crowned Bunnies are designed by Alice Palace for Craft Individuals.

I cut out the hearts from the sizzix Mini Hearts set and run it through the Diamond plate Embossing folder and coloured with Victorian Velvet Distress Ink and edged it all with Aged Mahogany.

This time last year Jamie and I moved into our new house in Mid wales, we didn't have the furniture that was arriving the next day, but we were nice and cosy in our sleeping bags.

Hope you have a great day and love to see you again soon

Sharon x 

Tuesday, 5 February 2013

My February Tag

Hello everybody, not sure where the time has gone, guess that is what happens when your are really busy. Not complaining though, we have had a lot of fun creating projects for our new upcoming workshops

We have so many super ideas, if you are interested pop and have a look at ATP. But of course the most exciting news that Finnabair is coming to Derbyshire to do a workshop for us, the details have yet to be finalised but we know that there will be 4 separate classes and there has been a lot of interest already.

I received a new stamp from the lovely people at Craft Individuals and because he is such a cutie I thought he could feature in my february tag..... So here's Party Puffin.


I painted the background with Paper Artsy's Baltic blue, then added snowflake to Indigo Blu's Bubbles (BB1) Background stamp. When completely dry I applied a coat of Satin Glaze all over to give it a sheen.

I then stamped Party Puffin (CI-376) onto white card and cut it out, I also stamped it onto a scrap piece of black cardboard to give it some depth. He was coloured in using distress markers and his crown painted with Old gold paint.

"Love" is from Tim Holtz stamp Stuff to Say (CMS110) and coloured again with distress markers. The I and U are grungeboard letters that I have had for ages.

The tag has been matted on black card and a heart ribbon added, very easy to do and I think it would make a super Valentine's card.


Here is a quick peek at a background I did in my journal. I really love doing backgrounds, but my problem is I don't like covering them up.

It is Paper Artsy Acrylic paints and Crafters workshop stencils. Thanks again to Leandra from Paper Artsy for the super Video on You Tube of how to do the Bump Stencil Technique.

Don't forget go over to the shop to have a look at the workshops, there will be new one's arriving, and there's new stock coming all the time, soo.. exciting.

Well i'm off Pondering Petunia is waiting to be sprayed and painted, if only it was that easy to look gorgeous, I think I will have to settle for a pair of striped socks.

Bye for now, thank you for popping by and leaving lovely comments.

Sharon xxx