Showing posts with label Border Collies. Show all posts

Wednesday, 15 January 2014

Catch up and a Happy New Year

Hello everybody and Happy New Year to you all.

Now that Christmas is over I am trying to get back into the swing of things, and I am sure it's the same for most of you.

Because I have not blogged since November I am going to try and do a short recap, we have had some fantastic workshops and also special guests Sue Carrington and Finnabair to show us how to create some super projects.

Here is the box we made with Sue;

This is Ruth's box the colours were very rich brown's and greens, my photo does not bring out the colours.


This is the sample made by Sue.


Here is Sue and you can just see Pam and Marilyn busy at work.


Sheila and Ruth.


The inside of the box, lined and stamped. Sue did a brilliant job of cutting and scoring the liners for the box's before the workshop and they all fit really well.


Here is my box, I really enjoyed being able to take part in the workshop, thank you again Sue and I am looking forward to the next one...


After that came the biggest workshop we have ever organised but not the last, this year we hope to host a few big ones so keep checking our website for more news.

Anna trying to say goodbye to Jack, but he wanted to play more football.


The start of the weekend was made even more exciting with Leandra from Paper Artsy kindly demonstrating at our shop, here is Ann and Helena watching the process of building up layers with chalk acrylics, stamps and stencils.


Onto the Finnabair workshops and this is the start of my picture before any gesso, paint or sprays. you may wonder why my picture is of Finnabair, well my pictures did not turn out so Anna came to the rescue and let me have one of her photo's, Thank you Anna.


Here's Anna going round the class showing her sample of how it should start to progress.


Here is the start of mine, we had to decide what colours we wanted to use and I choose the same colours as Penny because our base colours were very similar. But the end result was completely different. We used Luminarte Primary Element Pigments and the effect it creates will always be different. 


Here are my completed pictures.


Then we had a Paper Artsy workshop, using as much PA products as possible. So there was 

we also used 
Sizzix Vintage Valise and Sized Arches to make the inner frame.
Route 52 Half Tree Trunks to make the outer Frame along with Kraft Cardboard (greybeard)
The Crafters Workshop Stencils 


And here is Jamie enjoying his trifle at Chatsworth House where we had our works christmas meal.


New workshops are being added to the section now, with Sue Carrington coming up first on Saturday 22nd February with a wonderful altered Pink Pig Landscape Sketchbook class called Sketchbook Magic

Thanks all for your patience and hope to see you soon x


Monday, 7 January 2013

Here's to the new year ahead

Happy New Year to you all and I hope you had a most enjoyable Christmas. Jamie and I spent Christmas at home with the boys (Jack and Bru) they enjoyed opening their pressy's, chew sticks and footballs for both.

So after one day of watching too much television the boredom set in, the best cure for that is crafting,  especially when I had some new stash to play with. Oh the luxury of new paint brushes, but the next projects I'm going to share with you I didn't use a brush.
I decided to have a go with cut and dry foam after watching Leandra's Video's on you tube, if you need some inspiration pop over and have a look they certainly got me tapping.


I have used a combination of Paper Artsy, Indigo Blu and Stampers Anonymous stamps.


The flowers and leaves are from Indigo Blu's stamp Bloomin Great using Archival Ink Colbolt.

I have also stamped with Paper Artsy's Acrylic paint onto a Paper Artsy mini no 71.
I also tried with a different acrylic paint that wasn't chalk based but I was unable to blend them as well.


The watch face in the background is a Ink and the dog stamp Clocks Plate 1 and the car is from Tim Holtz Mini Muse CMS063.


This really is a fun technique Leandra calls it Corner Corner Side. The next thing on the agenda is to work on building up my layers, I don't like covering up a nice background but I always admire other peoples work.

I have also signed up for the Lifebook 2013 online course by the beautiful and very talented Tam of Willowing Arts, so far I have done the warmup page and stage 1 of the course and I am loving it. I have been using paints and pens that I had forgot I even had and never used because I didn't know how to. So here's to a new year of learning and exploring.

I would like to say a special thank you to all our customers and friends of the blog and Facebook for all the orders you make and the kind comments you give.

See you soon Sharon xx


Tuesday, 20 November 2012

Jack in a Box


Hello

It's Tuesday again and the day I always think about blogging. Maybe because I have had a good crafting weekend, partly due to bad weather and the Grand Prix, if you know what I mean.

I have decorated a little house and I promise you this is the last christmas decoration I am going to make. Well this week anyway.


It is a wooden house that we sell at £3.49 a bargain. It needed a coat of paint so as usual I grabbed my favourite paints Paper Artsy Acrylic's and used Baltic Blue with a little dry brushing around the edges.

While that was drying I cut out the Pennant from the sizzix on the edge die aptly named Pennants twice, once with plain lining material and the second with a piece of card.

The material I sprayed with a Dylusions Spray London blue and left that to dry before stamping with the snowflakes from Tim Holtz CMS066 Mini holidays.
When all dried I glued the material to the card and then stuck the Route 52 Snowflakes to the back of the card.

The little Route 52 Bucket is painted with Pearl Dabber, the little boy who is posting his letter to santa was left over from the Shadow Box Drawer's. All the paper is from Graphic 45.

I painted the corked Vials and then stamped onto them when dried and decorated with Idea-ology Tinsel Twine.
The "Believe" Philosophy tag I wiped Snowcap Dabber over and removed to show the word better.

I made a little christmas card and distressed the edges and applied a little stamp from the Graphic 45 papers. So that's 2 projects and only 3 pieces of cardstock, I like to get good value from my paper.

The little bows that are dotted around are cut from the Sizzix Movers and shapers Mini Wreath and bow, which is at the apex of the house, plus the 25 from the reindeer and 25 set which has been embossed with Ranger's Rich Red (before embossing it looks a really bright red but changed to a lovely deep red).

Christmas Carols was stamped onto shrink plastic, I find the easiest way to shrink it without losing it, is place the piece in a box and let it go from corner to corner.

Hidden in the bottom corner is a ticket from a strip die and stamped with Merry Christmas from Tim Holtz CMS100 Odds and Ends there's something for every occasion on that stamp set.

Lastly Jamie wanted snow on the roof, so I splodge Mod Podge around the edges then sprinkled with Rock Candy Dry Glitter, I thought it looked quite nice but Jamie pointed out That it was frost and not snow.

Theres also the really cute wooden reindeers at the bottom and I think that's about everything.


Jamie's just made a lovely mug of coffee and then look what we found in the Photo Light Cube.

Oh Jack!!


Wednesday, 31 October 2012

Kaisercraft Shadowbox Draws

Hello everybody, I hope you had a good weekend and made the most of a sunny Saturday and then relaxed on the wet Sunday. There's me assuming everybody has the same weather as us in Mid Wales.

We had a splendid weekend starting with June, David, Josh and Sam arriving from Ashbourne, and with two sorts of delicious cake, Thank you again for taking a detour to come to see us and of course Jack & Bru where really pleased to see other humans and Nell and Neb their collies.

After that it was back to work and it was such hard work lol....

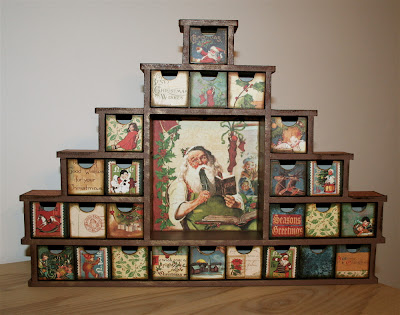
I just loved the Kaisercraft Shadow Box Drawers when they arrived into stock, and knew that I just had to make one :)

I choose to use Graphic 45 papers the Christmas Emporium range, I only needed to use 3 sheets of paper which were, Happy Holidays, Christmas Emporium and Special Delivery. They are a super weight and don't buckle under the glue.


It's a good idea to assemble the box before gluing. I did use wood glue in the end but you can use which ever is your favourite.


Next I glued all the little boxes with glossy accents. It does need a few minutes to grab so here's a photo of me multi tasking. Holding one closed while gluing the next (and listening to a audio book).


I made a template out of plastic packaging for the shape of the drawer fronts, so I could see what the picture was like before I  traced it and cut it out.


Here are the drawer fronts before gluing to see if I was happy with the one's I had chosen?


Here's Jamie doing his bit.


I inked all the edges with Tim Holtz Distress Ink Vintage photo this seems to bring everything together at the end.


Enough sitting down, time to stand up, oh what a surprise a football waiting for me, thank you Bru.


It was difficult to decide on the colour to paint the main box, because I wanted the same tone as the paper, so after three brown's the top coat is Claudine Hellmuth's Sable Brown.


Side pieces distressed with Walnut Stain Ink.


And here it is all assembled.


It will properly be filled with chocolates and I'm not sure whether to number the boxes 1 to 25 or if it will be pot luck if you get a chocolate or not.
I just had another thought you could decorate the back of the little individual boxes and have a spare centre picture and change the whole look of it so you could use it all year round. Remember a Shadow box isn't just for Christmas. 


Sorry but I thought it was too early to decorate the Christmas trees. They are gorgeous from Tim Holtz's Idea-olgy range, if you want some don't leave it too long because they are flying out.


You can also get the little buckets and terracotta plant pots from us check out Route 52.

Thank you for looking in and I hope this inspires you to have a go, This Shadow box with be one of these items that gets unpacked year after year. It could even become a family heirloom!

Sharon